Palo Alto Configuration
Define a RADIUS Server Profile
Sign in to the Palo Alto Networks Admin console with sufficient privileges.
Navigate to Device > Server Profile > Radius, and then click Add to define a new RADIUS server. The screen shown below opens
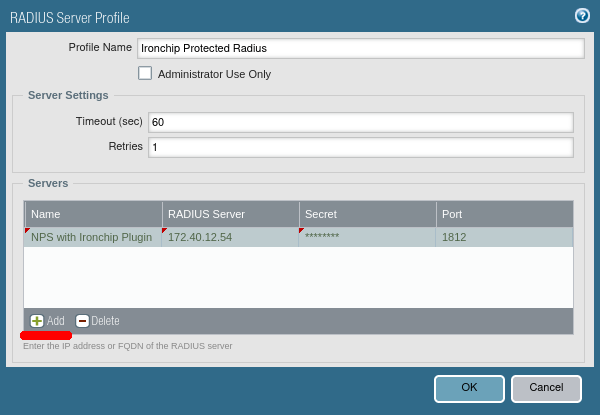
Enter a profile name that is unique and appropriate, and enter the following server settings, as shown above.
-
Timeout (sec): 60
-
Authentication Protocol: PAP
-
Retries: 1
Click Add in the screen shown above to define a server. Enter the following settings:
-
Name: Unique and appropriate name
-
Radius Server: IP Address of the Server you installed the Palo Alto Radius Agent above.
-
Secret: The Radius Secret you defined in the Ironchip Protected Radius App above.
-
Port: The UDP Port you defined in the Palo Alto Radius App above.
Click OK to save the settings.
Define an Authentication Profile for Ironchip Palo Alto RADIUS Agent
Select Device > Authentication Profile and then click Add to define an Authentication Profile.
Click Authentication tab. The screen shown below opens.
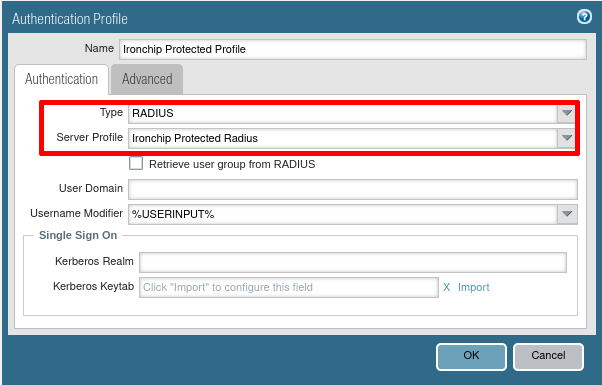
Leave all settings default settings except:
-
Type: RADIUS.
-
Server Profile: Enter the name of the Server Profile you defined in Step 1, above. When done, click OK.
In the Authentication Profile screen, select the Advanced tab. In the screen shown below, select Add to assign an Allow List. Then, select All from the displayed options.
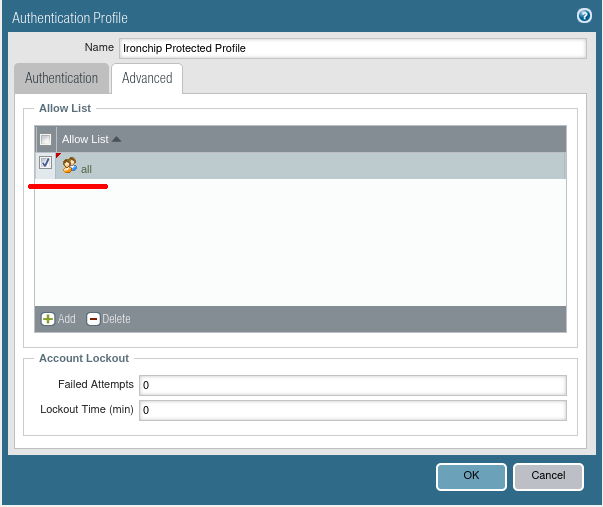
Click OK to save the settings.
Click Commit to save the Ironchip RADIUS Authentication Profile.
Open the Palo Alto Networks Administrative Shell and test the Authentication Profile.
Apply the Ironchip RADIUS Authentication Profile to a Gateway
Select Network > GlobalProtect > Gateways and open your configured GlobalProtect Gateway.
Select the Authentication tab to define Client Authentication Settings.
Click Add to update Client Authentication to the Ironchip RADIUS Authentication Profile you just configured.
Leave the default settings except for the following:
-
Name: Unique and appropriate name
-
OS: Any
-
Authentication Profile: Enter the Authentication Profile you configuredabove.
-
Authentication Message: Enter appropriate instructions for end users such as “Enter login credentials”.
Click OK to save the settings.
Configure the GlobalProtect Portal to use the Ironchip RADIUS Authentication Profile
Note: The step applies the same settings that you just applied to you GlobalProtect Gateway to the GlobalProtect Portal.
Select Network > GlobalProtect > Portals and open your configured GlobalProtect Portal.
Select the Authentication tab to define Client Authentication Settings.
Click Add to update Client Authentication to the Ironchip RADIUS Authentication Profile you just configured. Leave the default settings except for the following:
-
Name: Unique and appropriate name
-
OS: Any
-
Authentication Profile: Enter the Authentication Profile you configuredabove.
-
Authentication Message: Enter appropriate instructions for end users such as “Enter login credentials”.
Click OK to save the settings.
Commit all Settings
Click Commit to save the Irochip RADIUS configuration within the Palo Alto Networks Admin Console.